Note that the products discussed on our site are independently selected by our editors. Your purchases through our recommendations may earn us a commission at no extra cost to you.

So, you’ve got yourself a new ceiling fan. The next big thing is to put it up in place. But as with doing anything for the first time, installing a ceiling fan may seem tedious and a hard thing to do. However, with the proper guidelines, and a little bit of know-how around electrical equipment, you can indeed install your ceiling fan yourself pretty easily.
However, this job is not for everybody. Improperly installed ceiling fans can be a huge safety hazard for the house and those living in it. So, you need to know when to approach the installation yourself and when to hire an electrician.
In this article, we will show you how to install a ceiling fan in different situations, and also explain if you should hire someone to do the installation for you or do it yourself.
Related read: how does a ceiling fan work
Should You Hire Someone or Do It Yourself?
Installing a ceiling fan is a pretty straightforward job if you understand what you are doing. So, ideally speaking, if you are handy with electricals, understand the job properly, and are confident, you can go ahead and do it by yourself.
But if you have no prior knowledge of installing electrical equipment, and don’t seem to get your head around the instructions, you should avoid doing it yourself, and rather have someone do it for you. Sure, it might cost you a decent amount of money, but in the long run, it will actually save you money by protecting you and your house from hazards imposed by an improperly installed ceiling fan.
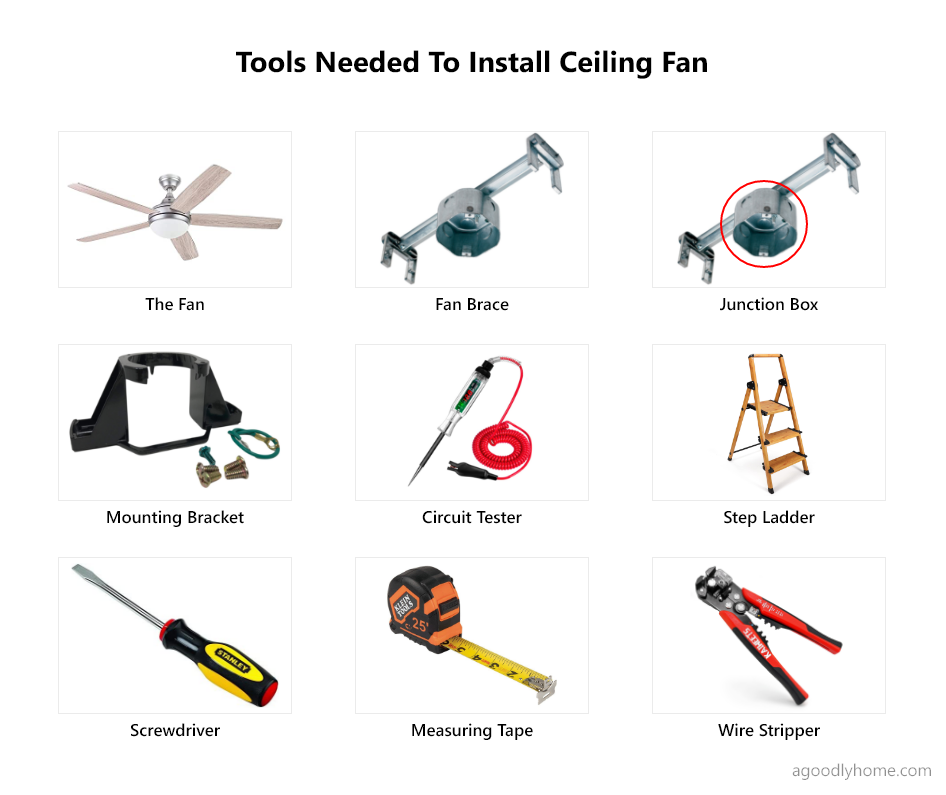
Tools needed
In this section of the guide, we will discuss the tools needed to install your ceiling fan. Following is a list of tools you may need along the process:
- The fan: You will need the fan of course!
- Fan brace: This is a metal bar that supports the ceiling fan. It attaches to the joists in the ceiling, and the junction box attaches to it.
- Ceiling fan-rated junction box: This is usually provided with the fan brace. It attaches to the brace and holds the wires once the installation is done. And more importantly, the mounting bracket attaches to it.
- Mounting bracket: The mounting bracket is very essential as this is what the fan will directly connect to.
- Circuit tester: You may need this to test if there’s electricity on a certain wire.
- Step ladder
- Screwdriver
- Measuring tape
- Wire stripper
Preparation
Good preparation goes a long way toward bringing success in any job, and the same is true with installing ceiling fans as well.
Read the manufacturer’s instructions
You should first read the manufacturer’s instructions, and make sure you understand everything clearly. You should also check the reviews section on online listings of the same product for any extra information from other users that may be necessary while installing it. Many a time, manufacturers would miss a point or two, and the users would point it out. Knowing such information beforehand will directly translate into more time-saving while doing the installation.
Turn off power
You should then turn off the power from the breaker panel. A good practice is to leave a note on the power switch reminding others not to turn the power back on.
How to install a ceiling fan
Installing a ceiling fan is a pretty straightforward job. Below is a general step-by-step guideline showing you how to install a ceiling fan in an ideal situation. For this section of the guide, we are assuming that you have the right tools at hand, and power coming to the location where you want to install the ceiling fan, along with the hole cut right into there on the ceiling. With that, the following is the step-by-step process:
- Turn off power from the breaker panel (very important, so reminding you again).
- Put the brace through the hole and install it between two joists (check YouTube for help).
- Install the junction box to the brace.
- Thread the wires through the mounting bracket and install the same to the junction box.
- Take the fan and install the downrod to its body (don’t forget the canopies).
- Install the hanger ball to the downrod.
- Lift the fan up and slide the hanger ball of the downrod into the mounting bracket and make sure the hanger ball is farmly sitting in the grooves cut into the bracket.
- Now connect the wires together. White from the fan to the white from the power source, black from the fan to the black of the power source, and green likewise. Lastly, if you have a light kit on the fan, chances are you have a blue wire as well coming from the fan. Connect it to the black of the power source.
- Slide and put the canopies into place.
- Install the fan blades, one by one.
- Finally, install the lights and their cover (light globe).
- Done! Now your fan should start operating if you turn it on.
Very important: You must ensure that the junction box and the brace are fan-rated and can support the weight of the fan. Otherwise, if you install the fan on a box that is not fan-rated, the whole thing can fall and wreak havoc on anyone or anything underneath.
Note: You should install your ceiling fan at least 18 inches (or more) away from the walls, according to EnergyStar.
Additionally, you can watch the following video to understand the process better.
How To Install a Flush Mount Ceiling Fan
Installing a flush-mount ceiling fan is very similar to installing one with a downrod, with the only difference being that with the former one, you skip the downrod part. All else is very similar. Watch the following video for a videographic demonstration.
How To Install a Ceiling Fan Without Existing Wiring
Installing a ceiling fan without existing wiring is also similar to what we have stated above in the “How to install” section, except that you have to do the extra part of bringing power from a power source to where you want to install the fan. You will probably be using something called “fish tape” to do so. Watch the following video to see it in action.
How To Install a Ceiling Fan In Place Of a Light Fixture
Installing a ceiling fan in place of a light fixture is not much different than what we have stated above. In fact, it’s actually easier in that you probably already have the brace installed. And if you do, check if it’s fan rated. If it is, then you have saved yourself some extra work of installing the brace. If it’s not fan-rated, however, then you have to install one that is. The rest of the process is similar to what we have stated earlier in the “How to install” section.
Watch the following video to see a videographic demonstration.
After Installation
Alright, you now have a new ceiling fan installed properly, and is operating properly as well. What’s next?
Do regular maintenance
It’s vital to ensure that everything is fine with your ceiling fan every now and then to ensure a safe experience with ceiling fans. So, you should do the necessary maintenance on your ceiling fans from time to time, at least twice a year.
Ceiling fans tend to accumulate a lot of dust on the front sides of the blades and also in the light globes. Extra dust on the blade tips reduces the fan’s efficiency greatly. So you should clean the fans often. See this guide for that: how to clean ceiling fan blades.
Then, you also need to ensure that there’s enough lubrication on the bearings to reduce wear and tear, noise, and electricity usage. All of that will happen if there’s not enough lubrication on the bearings.
Last but not least, you also need to ensure that your ceiling fan is running wobble-free. While a wobbly ceiling fan is not usually dangerous, it can be sometimes, depending on the level of wobble. See more here: Are ceiling fans dangerous?
See more about maintenance here.
FAQ
The following are a few frequently asked questions that you too may have in your mind.
How much does it cost for professional installation?
A standard professional ceiling fan installation can cost you something between $60 and $250. The cost largely depends on the complexity of the project, how much work is already done (wiring, box installation, etc.), the size of the fan, and of course, your location on the map.
Is it easy to install ceiling fans?
Installing a ceiling fan is a pretty straightforward and easy job if you are handy with electricity. But if you are not, you may need an electrician to install the fan for you. Proper installation is the key to a safe experience with ceiling fans.
How to install ceiling fan downrod extension?
With downrods, you usually have to install it by threading it like a screw into the fan’s body. And then, finally, you secure the installation with a screw that goes horizontally into both the downrod and thread it attaches to.
How long does it take to install a ceiling fan?
If you are handy with electricity, a ceiling fan installation can take somewhere between half an hour to two hours. Depends, again, on the complexity of the project.
Final Words
There you have it. We hope our ceiling fan installation guide was helpful to you.
The most important thing to remember when installing ceiling fans is – proper installation is the key to a safe experience while using ceiling fans. Find out more about what can happen when they are not properly installed and fall as a result.
Do you have anything in your mind you want to share?
Let us know in the comments section below. Thank you for reading.
Next Up
How much do you know about ceiling fan benefits? Know here: pros and cons of ceiling fans.
Wondering if ceiling fans can fall? Here’s that: can ceiling fans fall?


Conversation
No Comments here